


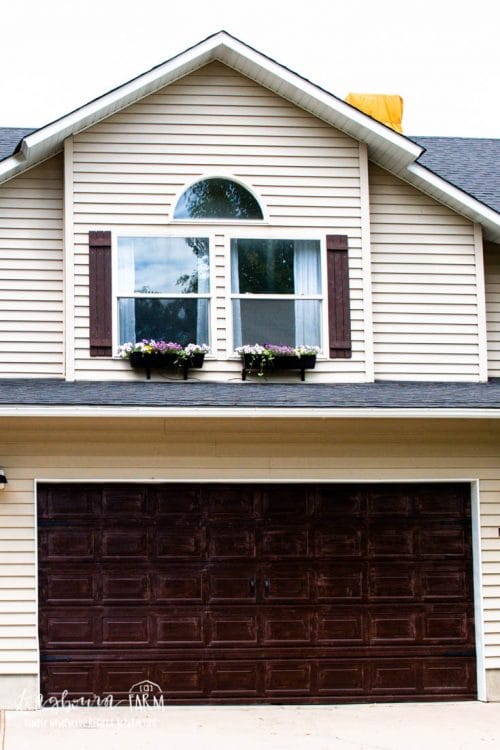
DIY Window Boxes are one of the easiest ways to add instant curb appeal to your home without breaking the bank. For just $30-40 per window, you can create beautiful planters that look just as good as the expensive ones—and they'll be completely hidden by flowers by mid-summer anyway!
WANT TO SAVE THIS RECIPE?
Enter your email below and we'll send it straight to your inbox. Plus you’ll get great new recipes from us every week!
Why DIY Window Boxes Are Worth Making
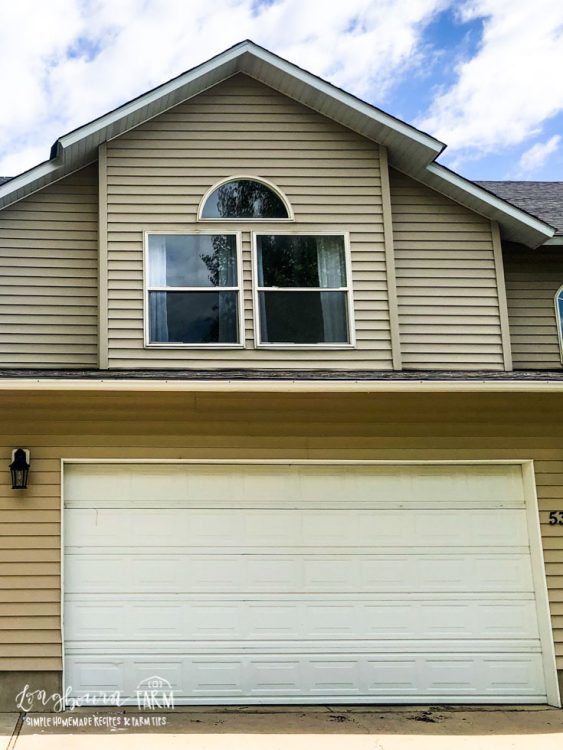
Let's be honest—when I started pricing window planter boxes online, my jaw hit the floor. Quality planters were running $70 to $150 each, and the reviews were full of complaints about cracking plastic, rusted metal, and boxes that looked cheap despite the premium price tag.
Meanwhile, I could build my own for about $30-40 per window using sturdy materials that I hand-picked myself. That's a savings of $40-$120 per box, and when you're doing multiple windows like I was, those savings add up fast.
But beyond the money, there's something incredibly satisfying about building these yourself. You get to choose exactly the size that fits your windows, pick brackets that match your home's style, and know that every screw is secured properly into a stud.
Plus, there's that little rush of pride every time you pull up to your house and see your handiwork adding all that charm to your home's exterior. And here's my favorite part: since the flowers will eventually hide the boxes anyway, you can feel great about keeping things simple and budget-friendly without sacrificing an ounce of beauty.
Supplies for Making DIY Window Boxes
- Black Plastic Planter: Boxes in the length you need. I used the 36 inch boxes for my windows that are 4 feet wide.
- 2-3 brackets per window box: I used 2 for each of my boxes in the 8 inch width.
- 3-inch Wood Screws and nails (if needed)
- DeWalt Cordless Drill
Set Yourself Up for Success Before You Start
- Measure your windows before shopping: Grab a tape measure and check the width of your window trim before you head to the store. You want your planter box to be slightly shorter than your window width—I aim for about 6-8 inches shorter so it looks proportional and centered. Trust me, there's nothing worse than getting home with a 48-inch box for a 40-inch window!
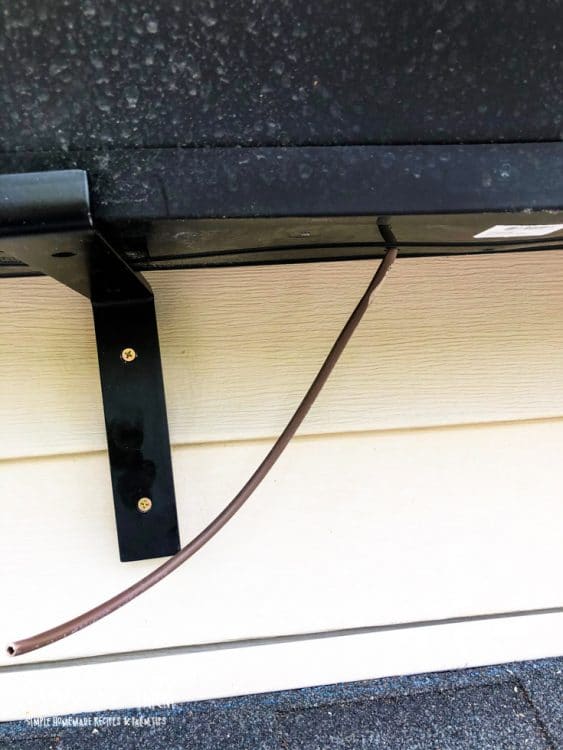
- Choose brackets rated for outdoor use: This isn't the place to cheap out! Look for brackets specifically designed for exterior use. They'll be weather-resistant and won't rust or corrode after one rainy season. I learned this the hard way with some indoor brackets that started looking shabby by August. Bonus points if they match your home's exterior hardware finish.
- Buy planter boxes with drainage holes: Your plants need to breathe, and standing water is a recipe for root rot and sad, droopy flowers. Make sure any plastic planter box you buy has pre-drilled drainage holes in the bottom. If you fall in love with a box without them, you can drill your own. Just use a ¼-inch drill bit and add 4-6 holes spaced evenly across the bottom to allow excess water to drain properly.
How to Make DIY Window Boxes
This is truly a fun project that anyone can tackle in an afternoon!
Step 1: On the window where you want to hang your window boxes, find a stud to mount the brackets into while still centering your box on the window. If you have vinyl siding, use a stud finder to locate the framing behind it.
Step 2: Mount the brackets on the wall making sure the box is where you want it. Drill pilot holes first to prevent splitting, especially if mounting into trim.
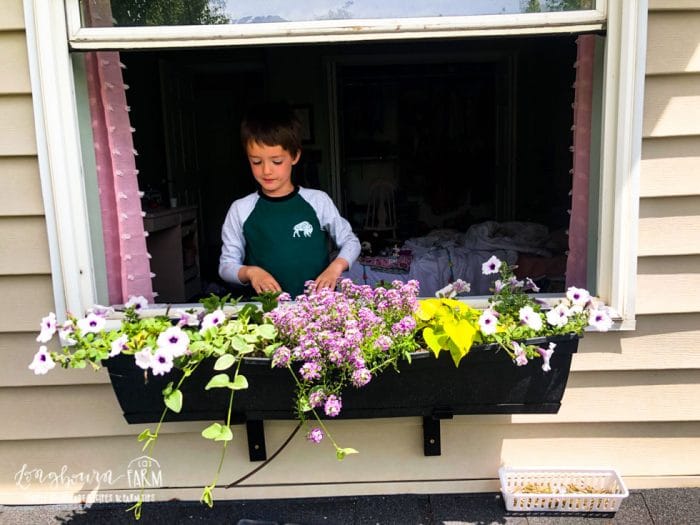
Step 3: Plant the planter box and run drip irrigation for easy, hands-free watering.
Step 4: Place the planter box on the brackets.
Step 5: Secure the box to the brackets, if desired.
Choosing the Right Size Window Box
When I installed my first set of window boxes, I'll admit I went a little too small. They looked cute but almost lost against the size of my second-story windows. The flowers eventually filled them out, but I learned an important lesson about proportion. Your window box should feel substantial enough to make an impact, but not so large that it overwhelms the window or looks awkward hanging there.
Here's my rule of thumb: choose a box that's about 75-80% the width of your window trim, and aim for at least 8 inches in height (I wish I'd gone with 10-12 inches, honestly). For depth, you want a minimum of 8 inches to give your plants' roots room to grow and stay healthy throughout the season.
If your windows are particularly tall or your home has bold architectural features, don't be afraid to go bigger. A slightly oversized box will look balanced once it's bursting with blooms, but an undersized one will always look a bit timid no matter how full the flowers get.
Best Plants for Window Boxes
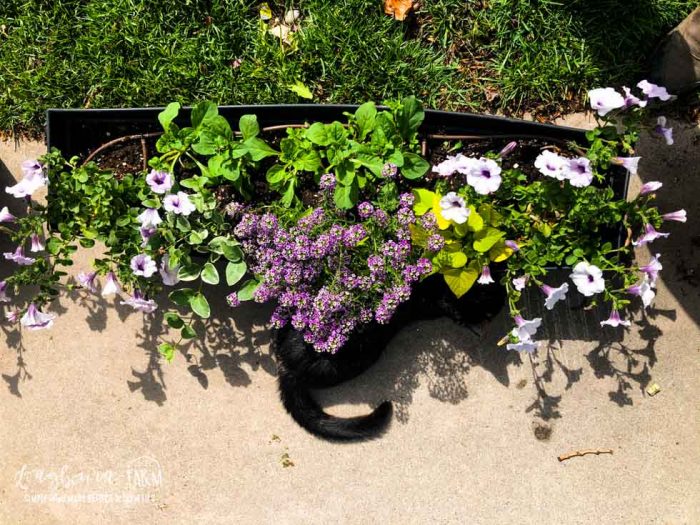
The secret to gorgeous window boxes isn't just about picking pretty flowers, it's about creating layers and movement that draw the eye in. I've learned through trial and error (okay, mostly error at first!) that gorgeous window boxes are all about creating layers.
Combine trailing plants that cascade over the edges, medium-height bloomers for fullness, and a few taller plants in back for visual interest. Think of it like staging a photo: you want depth, texture, and a natural flow that makes people stop and stare.
My Go-To Planting Formula:
Here's the arrangement that's never failed me, and it works whether you're planting for sun or shade:
Back row: Spilling plant on the left, medium-height centerpiece, spilling plant on the right
Front row: Spilling, trailing, center spilling, trailing, spilling
All your side spilling plants should match to create symmetry, but your trailing plants can be different varieties for visual interest. The key is making sure your center plants (both the tall one in back and the spiller in front) are in the same color family as your side spillers; this ties everything together beautifully.
Best Trailing Plants: These are your workhorses that cascade over the edges and soften the box:
- Petunias - Classic, prolific bloomers that come in every color imaginable
- Lobelia - Delicate cascading flowers perfect for a cottage garden look
- Sweet potato vine - My personal favorite for its dramatic foliage and fast growth
- Bacopa - Tiny flowers that create a waterfall effect
- Ivy geraniums - Heat-tolerant and gorgeous in full sun
Medium-Height Options: These fill the middle and provide that important height variation:
- Geraniums - Reliable, colorful, and practically indestructible
- Calibrachoa (Million Bells) - Like mini petunias with non-stop blooms
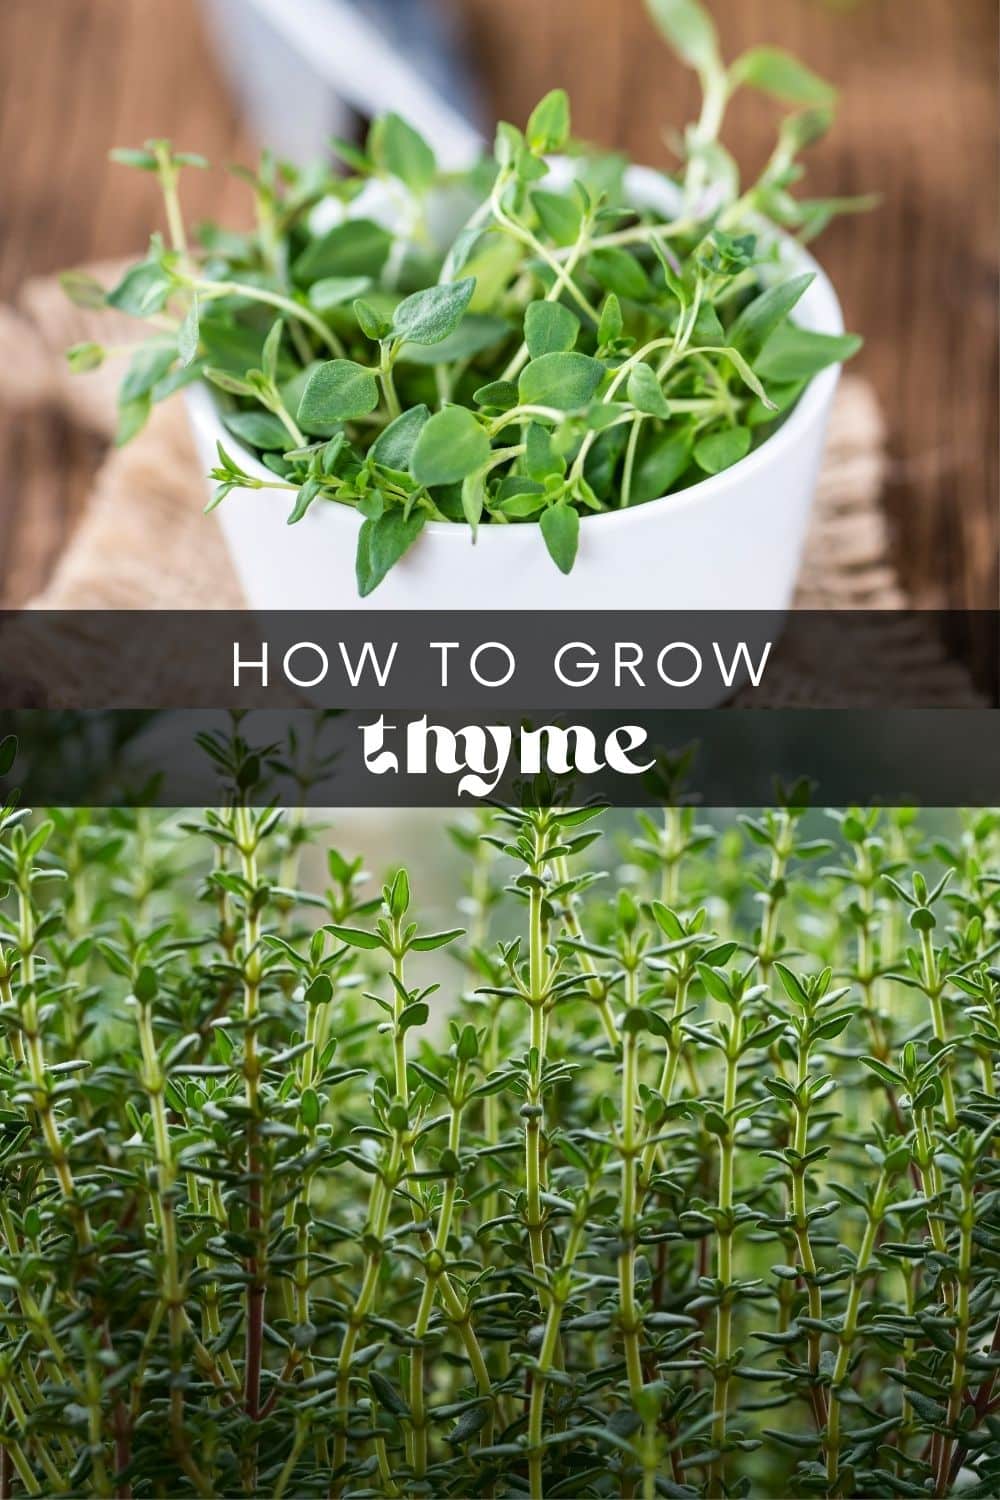
- Coleus - Perfect for shade with stunning foliage patterns
- Impatiens - Shade-loving champions that bloom all summer
- Salvia - Adds vertical interest with spiky blooms
Sun vs. Shade Considerations:
Full sun (6+ hours): Go with petunias, geraniums, calibrachoa, sweet potato vine, and verbena. These plants thrive in heat and will reward you with abundant blooms all season long.
Part shade (3-6 hours): Try impatiens, begonias, coleus, fuchsia, and torenia. These are more forgiving and won't scorch in afternoon sun.
Full shade: Stick with impatiens, begonias, ferns, and coleus. Embrace foliage over flowers—the textures can be just as stunning.
Seasonal Planting Ideas:
Don't limit yourself to just summer! Window boxes can provide year-round curb appeal:
Summer: Classic annuals like petunias, geraniums, and calibrachoa create that bursting-with-color look we all love
Fall: Swap in chrysanthemums, ornamental kale, pansies, and trailing sweet potato vine in autumn colors—think burgundy, orange, and deep purple
Winter: In mild climates, try evergreen branches, winter pansies, ornamental cabbage, and trailing ivy for a festive look that lasts through the holidays
The best part? By mid-summer, your plants will be so lush and full that the actual box completely disappears. That's exactly why I don't stress about fancy planters—the flowers do all the heavy lifting once they fill in!
Watering & Maintenance Tips
- Drip irrigation setup details: Run a simple drip line along the top of each box with emitters every 6 inches, connect to an outdoor spigot with a timer, and you're done. Cost about $25 and takes 30 minutes—total game changer for second-story boxes!
- Hand-watering alternatives: Get a watering wand with extended reach to save your back. Water early morning or evening, and check soil moisture with your finger first—if the top 2 inches are dry, give it a good soak until water drains out the bottom.
- Fertilizing schedule: Feed every two weeks with half-strength water-soluble bloom fertilizer. Window box plants are hungry since they're in a confined space, and consistent feeding makes a huge difference in flower production.
- Deadheading and pruning: Spend five minutes weekly pinching off dead blooms and yellow leaves. Mid-season, trim petunias and calibrachoa back by a third to trigger a second wave of blooms and prevent legginess.
Common Mistakes to Avoid When Making DIY Window Boxes
- Choosing boxes that are too shallow: Boxes under 8 inches deep don't give roots enough room, and you'll be watering constantly. Your plants will look stressed and stunted no matter what you do. Aim for 8-10 inches minimum.
- Skipping the stud finder: Those brackets are holding serious weight once you add soil, plants, and water. Screwing into just drywall is asking for a crash. Spend $15 on a stud finder and mount into solid wood framing.
- Overplanting: Resist cramming in extra plants! Overcrowding leads to disease and competition for nutrients. Leave 4-6 inches between plants—that sparse May box will be gloriously full by June.
- Not planning for plant growth: Those tiny nursery plants will triple in size by mid-summer. Choose trailing varieties over tall upright ones, or you'll be blocking your window view. Think mature size, not planting-day size.
DIY Window Boxes FAQs
Yes, a wooden planter box looks gorgeous and ages beautifully, but it requires more maintenance. You'll need to line the inside with a plastic liner to prevent rot, seal the exterior annually, and expect to replace them every 5-7 years. Plastic boxes last indefinitely and require zero upkeep, which is why I went that route for second-story windows I don't want to fuss with. If you do go with wood, cedar boards are your best option since they're naturally rot-resistant.
Most quality outdoor brackets are rated for 50-75 pounds, which is plenty for a planted window box. A 36-inch box filled with soil and flowers typically weighs 30-40 pounds when wet. Just make sure you're mounting into studs, not just siding or drywall—that's where the real strength comes from!
As long as you mount properly into studs and use appropriate outdoor screws, you'll just have small screw holes if you ever remove them—easily filled with exterior caulk and touched up with paint. The key is avoiding water damage by ensuring your planter boxes have good drainage and aren't trapping moisture against your siding. That's why I love plastic boxes with built-in drainage holes!
This happens more often than you'd think! Your best bet is to mount cleats (a horizontal board like a 1x4 or 1x6) across the studs you can find, then attach your brackets to that board. Paint it to match your trim, and it'll look intentional—almost like a decorative trim piece. Just make sure that mounting board hits at least two studs for proper support. For more advanced DIY projects like this, check out other tutorials on building custom mounting solutions.
Final Thoughts
There you have it! Beautiful DIY window boxes at a fraction of what you'd pay in stores. Once those flowers fill in, you'll have magazine-worthy curb appeal and the satisfaction of building it yourself. Now grab those brackets and get planting!


Leave a Reply