
Planting flower bulbs is super easy and gives you a massive bang for your buck come spring. Get the step-by-step instructions here.

WANT TO SAVE THIS RECIPE?
Enter your email below and we'll send it straight to your inbox. Plus you’ll get great new recipes from us every week!
While some might see winter as a time to take a break from gardening, others like myself, see it as an opportunity to plan our visions for the spring. There is much that can be done in autumn that only helps to give you a head start on gorgeous growth in spring.
In fall, while the plants around you look brown and dying, turn your eyes away from the soon-to-be hibernating plants and instead look underground.

Two reasons to enjoy bulb flowers are:
- A little work now will produce benefits later: Flower bulbs work hard underground throughout the weeks in autumn to produce growth and strong roots so that when the frost hits, they can sleep too, only to be awoken by the warmth of spring. When that sun finally breaks through the clouds above, your garden can be filled with colorful new life.
- Flower bulbs are very easy to maintain and garden because they can withstand some harsh weather. They’re a great flower for gardeners that are both new to the hobby and those with experience.
Read below to see more about how you can plant bulbs this year so that next year starts off with a burst of new life around your home.
Looking for more in-depth chicken-keeping information? Take my course, Gardening 101!
My exclusive Gardening 101 course guides you through each step, from starting seeds to harvest. This course will teach you everything you’ll need to know about planning and growing your own garden.

When do you plant bulbs?
Bulbs should be planted at least 6 weeks before the ground freezes in winter. For many states, this is September/October but it will depend on your specific area so make sure to take note of when the weather changes around you. A good sign of this is when the leaves first start to change colors outside.
Keep in mind that there are two classifications for flower bulbs. Some are hardy and can withstand the cold winters whereas others are tender and should be planted in the spring so that they can bloom in the summer or fall.
What type of flowers have bulbs?
There are many different flower varieties out there and while a good portion of them are grown from seeds, another portion is made from bulbs and these ones are the type that we are focusing on today.
Some of the most popular flowers that are grown from bulbs include Tulips, Daffodils, Irises, and Daylilies.
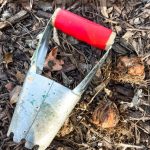
I planted Daylilies around our old home and thought it’d be the perfect opportunity to showcase all of the best tips and tricks so that your garden can be a success too. There is a super simple tool I use for planting bulbs that makes it a piece of cake: a bulb planter.
While you could argue that you are planting bulbs and are therefore a bulb planter, what I’m talking about is a nifty little device. It is made to dig perfectly sized holes in the ground just deep and wide enough for an actual bulb. This is much more convenient than using a hand shovel.

How to use a bulb planter
- A bulb planter looks like a cone with a handle and you use it by taking the handle in your hand while pressing the bottom of the cone (the narrow end) into the ground where you want to plant the bulb.
- Push down on the handle, twisting as you go until it reaches your desired depth in the ground. Most will have hash marks or some kind of line on the side to signify how deep it is.
- Some bulbs may expect to be planted at one depth while another type may want to be deeper. So this is pretty handy and I recommend looking for a bulb planter with these kinds of markings. It’s so much better than guessing.
- Lift up on the bulb planter and remove dirt from the inside if making multiple holes at once or just set the tool to the side. Place the bulb in the hole and cover it with dirt. If you left the dirt in the bulb planter you can just wiggle it out and back into the hole.

How to plant flower bulbs
- First, determine where you want to plant your bulbs and get the ground ready. You want the area to have good drainage and for the soil to be nice and loose. If desired you can even add some bulb fertilizer to your dirt.
- Figure out the type of bulb that you want to use and read up on it so that you can get a good idea of how to prep the area and plant them. Different bulbs will have different requirements but they should all be fairly easy.
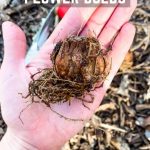
- Dig a hole in the ground to the right depth and then gently place the bulb into the ground with the tip upwards with the roots down.
- Cover with dirt again. If you’re planting in the fall you may want to add 2 inches of mulch on top of the ground to help keep the dirt warm and hydrated for the bulbs to grow.
Looking for more in-depth chicken-keeping information? Take my course, Gardening 101!
My exclusive Gardening 101 course guides you through each step, from starting seeds to harvest. This course will teach you everything you’ll need to know about planning and growing your own garden.

How to plant Daylily bulbs
Daylilies are tough flowers that can withstand some near-extreme temperatures so these are bulbs you can plant in the ground anytime between spring and fall. This will give them plenty of time to establish themselves before winter and to get a great headstart on growth.
- Soak your Daylily bulbs in lukewarm water for about 30 minutes before planting. This will help to rehydrate them as they may have been out of the ground for a week or two.
- Make sure to space the Daylilies well because they will spread and take up a great amount of space if left to their own. This is great for those of us wanting nice foliage and coverage in some areas.
- During the first year, water the flowers during dry weather and make sure that they get about 6 hours of sunlight per day to remain healthy.
- Plant the bulbs in the ground by digging a hole that is the depth recommended on your bulb’s packaging and a little wider than the bulb itself. Have the tip of the bulb facing upwards and cover the spot with dirt. Add mulch if needed and water the area well.
In just a few short months you’ll have a garden full of blooms and colors.

WANT TO SAVE THIS RECIPE?
Enter your email below and we will send it straight to your inbox. Plus you will get great new recipes from us every week!

How to Plant Flower Bulbs
Equipment
Ingredients
- 1 bulb planter
- flower bulbs
- bulb fertlizer (if desired)
Instructions
- First, determine where you want to plant your bulbs and get the ground ready. You want the area to have good drainage and for the soil to be nice and loose. If desired you can even add some bulb fertilizer to your dirt.
- Figure out the type of bulb that you want to use and read up on it so that you can get a good idea of how to prep the area and plant them. Different bulbs will have different requirements but they should all be fairly easy.
- Dig a hole in the ground to the right depth and then gently place the bulb into the ground with the tip upwards and the roots down.
- Cover with dirt again. If you’re planting in the fall you may want to add 2 inches of mulch on top of the ground to help keep the dirt warm and hydrated for the bulbs to grow.
Looking for more in-depth chicken-keeping information? Take my course, Gardening 101!
My exclusive Gardening 101 course guides you through each step, from starting seeds to harvest. This course will teach you everything you’ll need to know about planning and growing your own garden.


Leave a Reply