


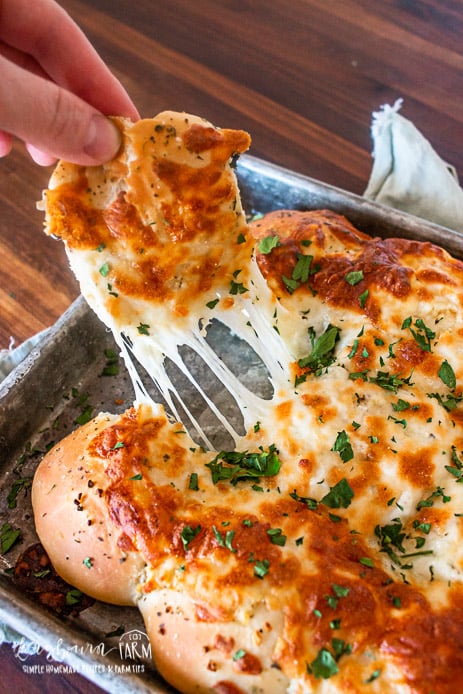
These cheesy garlic rolls are the definition of comfort food - soft, pillowy dough topped with gooey cheese and garlic butter that creates the most incredible aroma while baking!
WANT TO SAVE THIS RECIPE?
Enter your email below and we'll send it straight to your inbox. Plus you’ll get great new recipes from us every week!
You all know that I love making bread, but I also love using Rhodes Rolls as an amazing shortcut! I love the flavor of the rolls – sometimes premade dough can have a funny aftertaste but Rhodes Rolls never do. They raise perfectly every single time.
These cheesy dinner rolls are the perfect addition to any meal, offering a warm, gooey, and flavorful bite. The soft, pillowy rolls are infused with garlic butter and topped with melty cheese, creating a comforting treat that’s hard to resist. Whether served alongside pasta, soup, or as a party appetizer, they’re guaranteed to disappear quickly.
Why You’ll Love Making Cheesy Garlic Rolls
- Quick Prep: Ready in under an hour with minimal hands-on time - perfect for busy weeknights or last-minute entertaining. The active prep takes just 15 minutes, leaving you free to handle other tasks while they bake.
- Customizable Flavors: Swap cheeses, add herbs, or spice it up to suit your taste preferences. Whether you prefer mozzarella, cheddar, or a mix of cheeses, you can make it your own.
- Crowd-Pleasing Snack: Perfect for parties, gatherings, or family dinners—everyone loves cheesy, garlicky bread. They’re guaranteed to disappear quickly from any table.
- Versatile Dish: Works as an appetizer, side dish, or party snack - perfect alongside soups, salads, or served on its own. Leftovers reheat beautifully in the oven or air fryer, making them great for meal prep.
🍞 You’ve gotta try making cheesy garlic bread —it's so good, it'll disappear faster than I can set the table!
Recipe Ingredients
- Rhodes Rolls - frozen
- Olive oil
- Garlic
- Mozzarella cheese
- Parmesan cheese
- Italian seasoning
For the exact amounts needed, please see the recipe card below.

How to Make Garlic Cheese Rolls
- Spray a sheet pan with baking spray. You can use a half-sheet pan or a quarter-sheet pan for this recipe. If you use a half-sheet pan, be sure to center the rolls so they bake evenly.
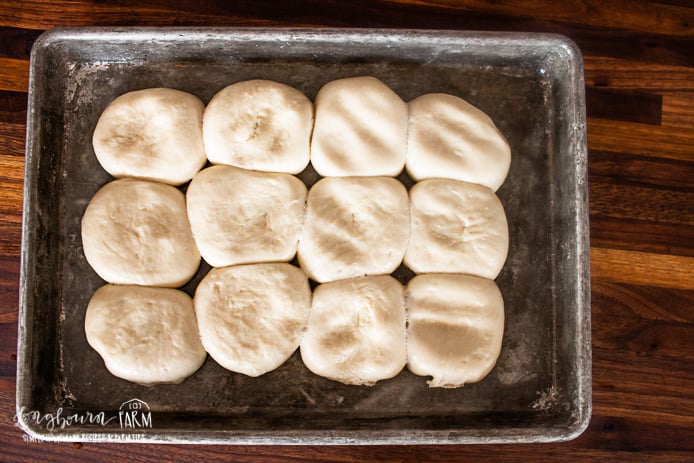
- Place the frozen rolls on the greased baking sheet, about 1 ½ inches apart.
- Once the rolls have thawed out and risen (this takes about 2-3 hours), gently flatten them with your hand.
- You want them to be about 1 inch thick and almost touching each other.
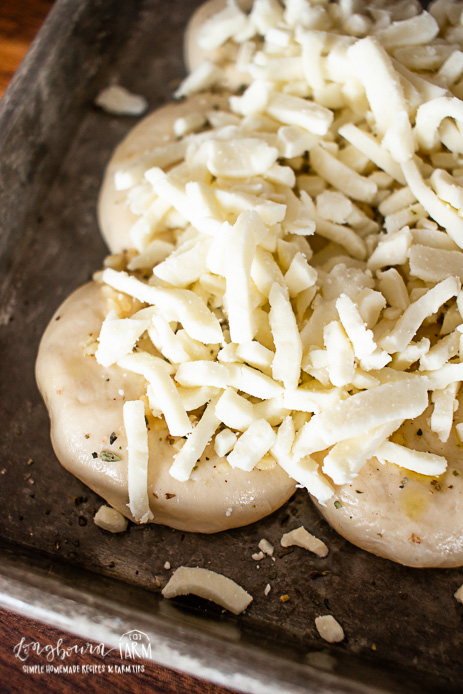
- Brush the tops with olive oil, sprinkle with garlic, and top with shredded mozzarella cheese and a little bit of grated parmesan.
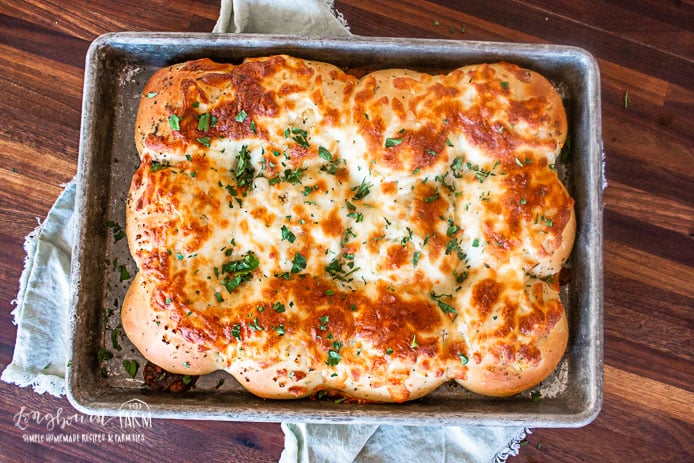
- Bake the cheesy garlic bread until it is a deep golden brown and then serve!
Recipe FAQs
Yes. Prepare up to 24 hours in advance and store unbaked rolls in the refrigerator. Let them come to room temperature for 30 minutes before baking.
Mozzarella is a classic choice for its meltability, but you can also use cheddar, provolone, or a blend of cheeses for extra flavor.
Yes. Freeze baked rolls for up to 3 months. Thaw overnight in the refrigerator and reheat in the oven until warm.
Expert Tips
- Use Fresh Garlic: Freshly minced garlic provides the best flavor compared to pre-minced or powdered options. It infuses the butter with a rich, aromatic taste that elevates the rolls. For a milder flavor, you can roast the garlic beforehand.
- Just Enough Cheese: Avoid going overboard on the cheese. Too much cheese can cause it to ooze off of the rolls and burn, while the right amount ensures a gooey, balanced bite.
- Brush Generously: Coat the rolls generously with garlic butter before baking for maximum flavor and a golden finish. The butter not only adds flavor but also helps create a soft, slightly crisp exterior.
- Rest Before Serving: Let the rolls rest for 5 minutes after baking to set the cheese and make them easier to handle. This short wait allows the flavors to develop even more and prevents the cheese from being too runny when you bite into them.
Storage Tips
Proper storage ensures your cheesy dinner rolls stay fresh and delicious for later enjoyment. Once cooled, store leftover rolls in an airtight container at room temperature for up to 2 days or in the refrigerator for up to 4 days.
To reheat, place them in a preheated oven at 350°F (175°C) for 5-10 minutes until warm and slightly crisp, or microwave for 20-30 seconds for a quick fix.
For longer storage, freeze unbaked rolls on a baking sheet, then transfer to a freezer-safe bag. When ready to enjoy, bake them directly from frozen, adding a few extra minutes to the cooking time.
Delicious Bread Recipes You Have To Try
If you're a fan of comforting, carb-loaded treats, these recipes are must-tries for your kitchen adventures!
- Soft and buttery, Homemade Garlic Knots are brushed with garlic and herbs, making them a delightful side for any Italian-inspired meal.
- Perfect for dipping in marinara, the Cheesy Garlic Bread Recipe delivers golden, crispy edges and a gooey cheese-filled center that’s simply irresistible.
- Infused with savory Italian herbs and gooey cheese, Italian Cheese and Herb Bread will quickly become a show-stopping favorite at your dinner table.
More Favorites From Longbourn Farm


Did you make this recipe? Leave a ⭐️ review and share it on Instagram, Facebook, or Pinterest!
WANT TO SAVE THIS RECIPE?
Enter your email below and we will send it straight to your inbox. Plus you will get great new recipes from us every week!

Cheesy Garlic Bread
Equipment
Ingredients
- 12 Rhodes Rolls (frozen)
- 2 tablespoons olive oil
- 2 teaspoons garlic (minced)
- 1 ½ cups mozzarella cheese (shredded)
- ¼ cup parmesan cheese (shredded)
- 1 teaspoon Italian seasoning
Instructions
- Spray a sheet pan with cooking spray. (See note).
- Place the frozen Rhodes Rolls on the greased baking sheet, about 1 ½ inches apart.
- Once the Rhodes Rolls have thawed out and risen (this can take 2-3 hours), preheat the oven to 350ºF.
- Gently flatten the Rhodes Rolls with your hand.
- You want them to be about 1 inch thick and almost touching each other.
- Brush the tops with olive oil, sprinkle with garlic, shredded mozzarella cheese, parmesan and Italian seasoning.
- Bake the Rhodes Rolls Cheesy Garlic Bread until it is a deep golden brown, about 20 minutes.
Notes
- You can use a half-sheet pan or a quarter-sheet pan for this recipe. If you use a half sheet pan, be sure to center the rolls so they bake evenly.
- Swap cheeses, add herbs, or spice it up to suit your taste preferences.
- I love to serve these rolls with simple soups and a fresh veggie tray!
- Always preheat your oven to ensure even baking and a perfectly crisp exterior. A properly heated oven helps the rolls rise and brown evenly, preventing undercooked or unevenly baked results.


Alli
So cheesy and delicious!