
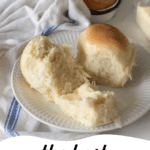
These homemade old fashioned dinner rolls are perfectly soft, buttery, and guaranteed to become a family favorite. With simple ingredients and easy-to-follow steps, these cloud-like rolls will elevate any family meal from ordinary to extraordinary.

WANT TO SAVE THIS RECIPE?
Enter your email below and we'll send it straight to your inbox. Plus you’ll get great new recipes from us every week!
There's something magical about the aroma of freshly baked dinner rolls wafting through your home. Homemade dinner rolls are a great way to turn an everyday dinner into a special occasion. The look on my family's faces when I place a basket of these warm, buttery rolls on the table makes all the effort worthwhile.
Whether it's a weeknight dinner or a holiday feast, these rolls complement everything from hearty soups to roast chicken. Plus, they're perfect for little hands to pull apart, making them an instant hit with the kids!

Why You'll Love This Old Fashioned Dinner Rolls Recipe
- Foolproof Recipe: Even if you're new to bread baking, this recipe is designed for success. The detailed instructions ensure perfect results every time, giving you the confidence to tackle homemade bread with ease.
- Make-Ahead Friendly: Life as a mom means planning ahead, and these rolls have your back! Make them a day or even weeks ahead (just freeze them), and you'll always have fresh-tasting rolls ready for any meal.
- Budget-Friendly Goodness: Using simple pantry staples, these rolls cost a fraction of store-bought varieties but taste infinitely better. Your family will think you splurged at a fancy bakery!
- Versatile Crowd-Pleaser: These rolls work for everything from Tuesday night spaghetti to Thanksgiving dinner. They're the perfect vehicle for sopping up gravy, making mini sandwiches with leftovers, or simply enjoying with a pat of butter.
🍞 Adding tasty homemade rolls to any meal will instantly make it feel special — and be more filling!
Recipe Ingredients
- Instant yeast
- Water
- Milk
- Butter
- Sugar
- Salt
- Eggs
- All-purpose flour
For the exact amounts needed, please see the recipe card below.

How to Make Old-Fashioned Dinner Rolls
Step 1. Combine warm milk, melted butter, water, yeast, sugar, and salt. Add flour gradually and knead into a soft dough.
Step 2. Let the dough rise in a greased bowl for 30 to 60 minutes.
Step 3. Divide dough into 32 pieces, shape into balls, and place on a greased baking sheet. Let rise again until doubled.
Step 4. Bake at 400°F for 14 to 18 minutes, then butter the tops and serve warm or at room temperature.

Recipe FAQs
Absolutely! If using active dry yeast, simply dissolve it in the warm water first and let it sit for about 5 minutes until foamy before adding it to the milk mixture. You'll need about 2½ tablespoons of active dry yeast to equal the 2 tablespoons of instant called for in this recipe.
Dense rolls usually happen when too much flour is added. Remember that the dough should be soft and elastic, but not sticky. Start with 6½ cups of flour and add more only if absolutely necessary. Also, make sure you're giving the dough enough time to rise, especially in cooler kitchens.
Once completely cooled, store rolls in an airtight container or bag at room temperature for up to 3 days. For longer storage, freeze them in an airtight container for up to 3 months. Thaw at room temperature and reheat wrapped in foil in a 300°F oven for about 10 minutes.
Yes! Add the ingredients in the order recommended by your bread machine manufacturer. Use the dough cycle, then remove and shape the rolls, let them rise a second time, and bake as directed in the recipe.

Expert Tips
- Milk Temperature: When scalding the milk and melting the butter, aim for a temperature between 120-130°F. Any hotter could kill the yeast, while cooler liquid won't activate it properly. If you don't have a thermometer, the mixture should feel warm but not hot when you touch it with your finger.
- Window Pane Test: To check if you've kneaded the dough enough, perform the "window pane test." Take a small piece of dough and gently stretch it. If it stretches thin enough to see light through without tearing, your dough is ready!
- Warm Rising Environment: If your kitchen is cool, create a warm environment for rising by preheating your oven to its lowest setting for 2 minutes, then turning it off. Place the covered dough inside with the door closed to create a draft-free, warm spot.
- Brush with Butter Immediately: Don't skip buttering the tops while the rolls are hot from the oven! This step not only adds flavor but also keeps the crust soft and adds that beautiful glossy shine that makes homemade rolls irresistible.
- Perfectly Shaped Rolls: For professional-looking rolls, use a kitchen scale to weigh each piece of dough (about 2 ounces each), ensuring uniform size and baking time. Then roll each piece on an unfloured surface using a cupped hand, creating surface tension that results in a perfectly round shape.

Some Family Favorite Dinner Rolls
There's nothing quite like the satisfaction of pulling a tray of golden, perfectly risen dinner rolls from your oven, or any bread for that matter! Here are some bread recipes that have stood the test of time in my family, and I'm certain will become a treasured tradition in yours, too.
- Honey Wheat Rolls: Soft, slightly sweet, and deliciously pillowy. Whip up a batch and freeze some for later!
- Simple Cheesy Garlic Rolls: The definition of comfort food - soft, pillowy dough topped with gooey cheese and garlic butter that creates the most incredible aroma while baking.
- Potato Rolls: Easy to make and turn out perfectly every single time! Whip up a batch and freeze some for later.

More Favorites From Longbourn Farm


Did you make this recipe? Leave a ⭐️ review and share it on Instagram, Facebook, or Pinterest!
WANT TO SAVE THIS RECIPE?
Enter your email below and we will send it straight to your inbox. Plus you will get great new recipes from us every week!

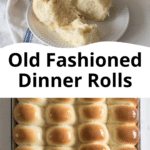
The Best Old Fashioned Dinner Rolls
Equipment
- Large rimmed baking sheet 13x18 inches
Ingredients
- 2 tablespoons instant yeast
- ½ cup warm water
- 2 cups milk
- ½ cup butter (cut into 8 pieces)
- ½ cup granulated sugar
- 2 teaspoons salt
- 2 large eggs
- 6.5 to 7.5 cups all-purpose flour
Instructions
- Heat the milk and butter together in the microwave to scald the milk and melt the butter, 2 to 3 minutes. Let the mixture cool for 10 minutes.
- In a large mixing bowl, combine milk/butter mixture, water, yeast, sugar, and salt. Let yeast rest for 5 minutes.
- Add half the flour, and mix for 3 to 5 minutes.
- Add the eggs, one at a time, and mix until incorporated.
- Add the rest of the flour, ½ cup at a time, until a soft dough forms. The dough should be soft and elastic, but not sticky. Knead with your mixer or by hand for 5 minutes.
- Let the dough rise in a greased bowl for 30 to 60 minutes.
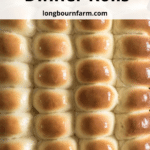
- After rising time has passed, divide the dough into 32 pieces. Roll each piece into a round roll, and place it on a greased, rimmed baking sheet (that is 13×18 inches).
- Once all the dough is shaped, cover the rolls, and let them rise for another 30 to 60 minutes. The sides of the rolls should be touching each other before you bake them, that’s how you know they are ready. If your house is cold it might take a longer for them to rise this much. See the photos of the risen rolls in the blog post for reference.
- Once the rolls have at least doubled in size, bake at 400°F for 14 to 18 minutes, or until the tops are nice and golden.
- Remove from the oven, and butter the tops of the rolls while still hot. Serve warm or at room temperature.
Notes
- To make this ahead of time simply make the rolls and bake them. After 10-15 minutes remove the rolls from the pan so that they bottoms don't get soggy from steam. Cool the rolls on a wire rack. When the rolls have cooled all the way, place them back in the pan they baked in and wrap them tightly in plastic wrap. Store at room temp if serving the next day or freezer for longer storage.
- Don't skip buttering the tops while the rolls are hot from the oven! This step not only adds flavor but also keeps the crust soft and adds that beautiful glossy shine
- For herb rolls, add 1-2 tablespoons of dried herbs like rosemary, thyme, or Italian seasoning to the dough. For cheese rolls, fold in 1 cup of shredded cheddar or Parmesan after the first rise, just before shaping the rolls.
- If using active dry yeast, simply dissolve it in the warm water first and let it sit for about 5 minutes until foamy before adding it to the milk mixture. You'll need about 2½ tablespoons of active dry yeast to equal the 2 tablespoons of instant called for in this recipe.


Leave a Reply