
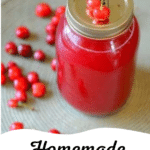

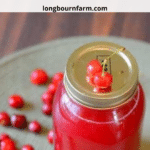
A simple, nutritious cherry juice recipe that requires minimal ingredients and effort but delivers maximum flavor and health benefits for the whole family.

WANT TO SAVE THIS RECIPE?
Enter your email below and we'll send it straight to your inbox. Plus you’ll get great new recipes from us every week!
As a mom juggling a million responsibilities, finding recipes that are both nutritious and easy to make can feel like striking gold. This homemade cherry juice recipe checks all those boxes and more!
Made with just fresh cherries and no added preservatives, it's a refreshing treat your kids will love and you'll feel good about serving. The best part? You can preserve it to enjoy the sweet taste of summer cherries all year long.
The natural sweetness of cherries makes this juice an instant hit with kids, while the impressive health benefits make it a smart choice for moms looking to incorporate more antioxidant-rich foods into their family's diet.
Plus, with a steam juicer doing most of the work, you'll have time to tackle the mountain of laundry waiting for you (or maybe just enjoy a quiet moment to yourself!).

Why You'll Love This Cherry Juice Recipe
- Incredibly Simple Process: No pitting required! Unlike many fruit recipes, you don't need to remove stems or pits, saving you valuable time and messy hands.
- Versatile Uses: From drinking straight to making jellies, and syrups, this juice is the gift that keeps on giving.
- Minimal Ingredients: All you need are cherries and a steam juicer. No added sugar required (unless you want it sweeter)!
- Long-Lasting: When properly canned, your homemade cherry juice will last for months, giving you a taste of summer even in the coldest winter months.
- Customizable Flavor: Mix different cherry varieties for unique flavor profiles, or add sugar to taste for those with a sweeter tooth.
🍒 Having this homemade cherry juice in your pantry will be the perfect reason to spoil your family (and yourself!) with a refreshing cherry limeade drink!
Recipe Ingredients
- Fresh cherries — Lots of cherries, at least 1 gallon!
- Steam juicer
For the exact amounts needed, please see the recipe card below.

How to Make Cherry Juice
Step 1: Wash and sort your cherries, no need to pit or remove stems. I do like to pick out the ones that are rotten and any leaves that might get mixed in.
Step 2: Get the steam juicer washed and set up according to instructions. Fill the hopper with your cherries. If you are using more than one type, mix them as you add them to get a more consistent juice flavor.
Step 3: Let them steam for an hour, making sure the bottom of the steamer doesn’t run out of water. The hopper full of cherries produces about four quarts of juice. If you have more cherries to do, throw out (compost or feed it to your chickens) the steamed cherries before doing your next batch.
Step 4: Process the juice in a hot water bath for 15 minutes (for quarts) for us high elevations and 10 minutes for you low-lyers.

Recipe FAQs
That's right! One of the biggest time-savers of this recipe is that the steam juicer extracts just the juice, leaving pits and stems behind. This cuts your prep time dramatically compared to other cherry recipes.
Any cherries will work! Sweet cherries like Bing produce a naturally sweet juice, while tart cherries give a more complex flavor that's excellent for baking. For a balanced flavor, try mixing different varieties.
When properly processed in a water bath canner, your cherry juice can last up to a year in a cool, dark place. Once opened, store in the refrigerator and use within 7-10 days.
While a steam juicer makes this process incredibly easy, you can also make cherry juice by cooking pitted cherries with water, then straining through cheesecloth. It's more labor-intensive but still doable!

Expert Tips
- Choose Ripe Cherries: For the most flavorful juice, select cherries that are fully ripe but not overripe or moldy. The deeper the color, the richer the flavor will be.
- Don't Rush the Steaming Process: Allow the full hour of steaming time for maximum juice extraction. Rushing this step will result in lower yield and less concentrated flavor.
- Monitor Water Levels: Keep an eye on the water reservoir in your steam juicer to ensure it doesn't run dry, which could damage your equipment and affect the juice quality.
- Label and Date Your Jars: When canning, always mark the date on your jars so you know when they were processed. This helps you use the oldest jars first for optimal quality.
Juicing Cherries Quick Guide 🍒
A juice steamer is your secret weapon for effortless fruit juice extraction! This three-tiered kitchen workhorse does all the heavy lifting for you. Here's how to use it:
- First, set up your steamer by filling the bottom pot with water to the recommended level (usually about halfway).
- Place the middle collection container with its funnel attachment on top, then position the top hopper above it.
- Wash your cherries or other fruit (no need to remove stems or pits!) and pour them into the top basket.
- Bring the water to a boil, then reduce to a steady simmer - the rising steam will gently heat the fruit, causing juice to release naturally and collect in the middle section.
- Simply attach the silicone tube to the spout, place a sterile jar underneath, and open the clamp to collect your crystal-clear juice!
Most fruit needs 45-60 minutes of steaming for maximum extraction, but remember to check the water level occasionally to prevent it from running dry. When finished, you'll have perfectly clear, ready-to-can juice with absolutely no straining required!
Ways to Use & Enjoy Cherry Juice
Cherry juice isn't just another summer beverage – it's a versatile kitchen staple that can brighten meals and snacks throughout the year. Here are some fun ways to use cherry juice (or any other homemade juice)!
- Mix it with lemon-lime soda for a special treat
- Use it as a base for homemade popsicles
- Create the most amazing cherry jelly for your morning toast
- Make syrup for baked goods, pancakes, and waffles
- Try mixing your cherry juice with sparkling water, lemonade, or even a splash of vanilla for different flavor combinations the whole family will enjoy!

More Favorites From Longbourn Farm


Did you make this recipe? Leave a ⭐️ review and share it on Instagram, Facebook, or Pinterest!
WANT TO SAVE THIS RECIPE?
Enter your email below and we will send it straight to your inbox. Plus you will get great new recipes from us every week!

Homemade Cherry Juice
Equipment
Ingredients
- 1 gallon fresh cherries
Instructions
- Wash and sort your cherries, no need to pit or remove stems. I do like to pick out the ones that are rotten and any leaves that might get mixed in.
- Get the steam juicer washed and set up according to instructions. Fill the hopper with your cherries. If you are using more than one type, mix them as you add them to get a more consistent juice flavor.
- Let them steam for an hour, making sure the bottom of the steamer doesn't run out of water. The hopper full of cherries produces about four quarts of juice.
- If you have more cherries to do, throw out (compost or feed it to your chickens) the steamed cherries before doing your next batch.
- Process the juice in a hot water bath for 15 minutes (for quarts) for high elevations and 10 minutes for low elevations.
Notes
- Sugar can be added to the juice to make it sweeter; just do that to taste.
- I used the juice for jelly and cherry syrup! Recipes to come.
- This juice is so good with lemon-lime pop (just when we are splurging)
- When canning, always mark the date on your jars so you know when they were processed. This helps you use the oldest jars first for optimal quality.


Leave a Reply