

Ciabatta bread is a simple recipe that yields a great result! Take the time to make this classic bread and get hearth style loaves at home.
WANT TO SAVE THIS RECIPE?
Enter your email below and we'll send it straight to your inbox. Plus you’ll get great new recipes from us every week!
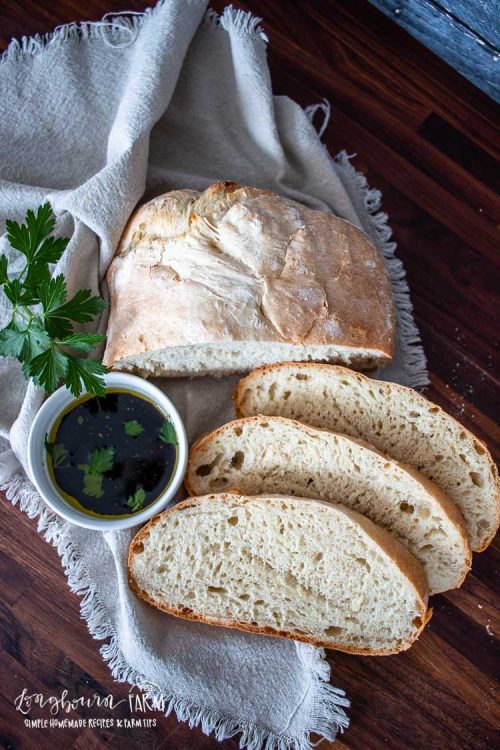
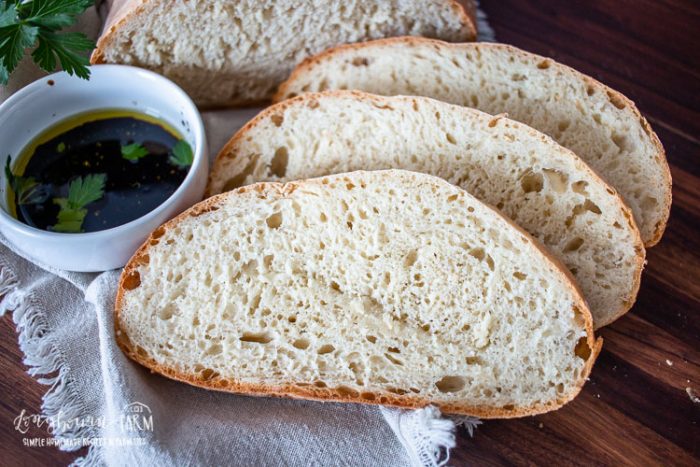
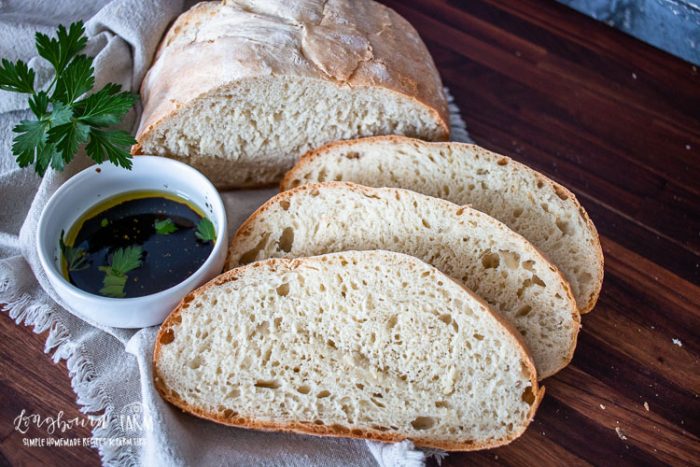
Ciabatta bread is a simple bread that tastes as great as it looks and it’s a fun word to say too! With soft a chewy texture and a denser bread structure, it makes for great sandwiches and other recipes.
Of course, toasting a few slices and spreading a decent amount of butter or spread over the top isn’t a bad idea either. 😉
I love this ciabatta bread recipe because it’s fairly simple. It is a little time consuming, but most of that time is simply waiting for the dough to do its job.
Unlike other yeast doughs, this one doesn’t require a good amount of kneading or extensive labor, the dough pretty much takes care of itself. Great news, right?
If you’ve never had ciabatta bread, you might be wondering “what is ciabatta bread?” Well, let me tell you- it’s a very simple bread made with flour, water, olive oil, salt, and yeast. In fact, the ingredients are pretty close to other breads like a French bread or baguette.
The biggest difference is the shape and method used for the dough rising and baking. There’s a fermenting process that gives it an almost sourdough taste too.
All of these things help to make this bread pretty unique although there are different variations out there. But this ciabatta bread recipe is one of the simpler ones to try, and can give you a better appreciation for this yeast bread.
How to Make Ciabatta Bread
This recipe has been broken down into two sections (preferment and actual bread recipe, for your convenience)
How to Make the Pre-Ferment
- In a bowl, combine your flour and yeast.
- Add in the water and then stir until everything is well combined.
- Let the bowl sit at room temperature for at least 8 hours, but preferably up to 24 hours.
To Make The Ciabatta Bread
- In a bowl, combine your flour, salt and yeast.
- Add in the pre-ferment and then lightly mix them together.
- Gradually add in the water and then mix until a wet dough forms. You may need to use more or less than the listed amount depending on weather, humidity, elevation, etc.
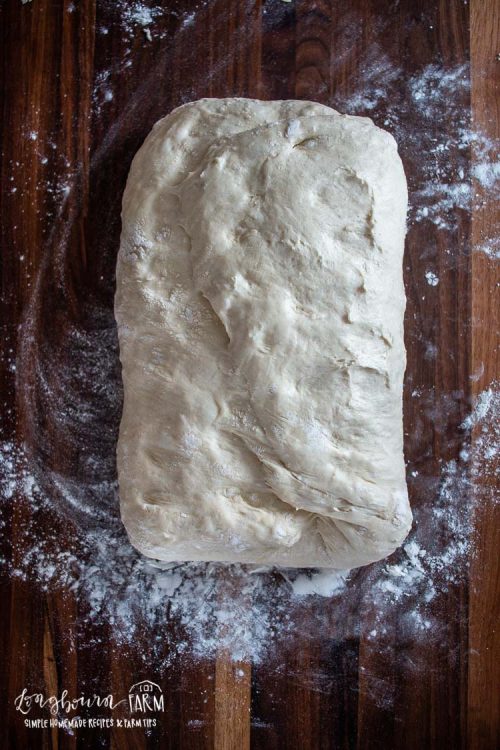
- Once a sticky dough has been formed, turn it out onto a well-floured surface.
- Gently form the dough into a rectangle.
- Fold in the dough into thirds, like a letter, every 30 minutes, 3 times.
- After the last folding, let the dough rise for an additional 30 minutes.
- Split the dough into two equal sized loaves.
- Form them gently on parchment by folding each in thirds again. They will be slightly flat rectangular loaves. They should be roughly about 6 inches by 8 inches in size.
- Preheat your oven to 500ºF and then place a baking stone or a baking sheet tray in the oven to preheat as well.
- Let the loaves rise for an additional hour, they won't quite double but it will be close.
- Fill a 9x13 pan with water and place it on the top rack of the oven. This will create steam and will help make the outside of the loaf nice and crusty.
- Place the loaves on the baking sheet or baking stone (leaving the parchment under them).
- Reduce the oven temperature to 450º degrees F.
- Bake them for 10 minutes, then rotate the loaves and bake for an additional 10 minutes.
- When they are finished the loaves will be golden brown and the internal temperature will register at 205ºF.
Can you freeze ciabatta bread?
Yes! Ciabatta bread freezes very well. Just wrap your completely cooled loaf of homemade ciabatta bread in plastic wrap or aluminum foil and then place it into an airtight container like a zipper topped bag. Freeze up to 3 months and thaw before use.
How long can you keep ciabatta bread?
Unlike store-bought bread filled with shelf stabilizers and preservatives to get them to last forever, this homemade bread won’t last nearly as long (that’s actually a good thing if you think about it).
You can expect it to taste great for up to 3 days, and while it may last longer before getting moldy or gross, it will dry out before that point. You can use your dry ciabatta bread for other recipes (like a breakfast strata or bread pudding) to get the most out of it.
Should I put my ciabatta bread in the fridge?
I wouldn’t recommend it. Placing your homemade bread in the fridge will cause it to dry out faster than leaving it on the shelf or counter whether it was wrapped or not.
The only exception I’d make is if you turned the bread into a meal prepped cold sandwich and needed to keep it safe before consuming.
More Favorites From Longbourn Farm


Did you make this recipe? Leave a ⭐️ review and share it on Instagram, Facebook, or Pinterest!
WANT TO SAVE THIS RECIPE?
Enter your email below and we will send it straight to your inbox. Plus you will get great new recipes from us every week!

Ciabatta Bread
Ingredients
For the Pre-Ferment
- 2 cups flour (all-purpose)
- ¼ teaspoon yeast (active dry or instant, see note)
- 1 cup water
For the Ciabatta Bread
- 2 ½ cups flour (all-purpose)
- 1 ½ teaspoon salt
- 1 teaspoon yeast
- 1 cup water (see note)
Instructions
For the Pre-Ferment
- Combine the flour and yeast.
- Add the water and stir until well combined.
- Let sit at room temperature for at least 8 hours, up to 24 hours.
For the Ciabatta Bread
- Combine the flour, salt, and yeast.
- Add the pre-ferment and mix lightly.
- Add the water gradually and mix until a wet dough forms. You may need to use more or less than the listed amount depending on weather, humidity, elevation, etc.
- Once a sticky dough has formed, turn it out onto a well-floured surface.
- Gently form into a rectangle.
- Fold in thirds, like a letter, every 30 minutes, 3 times.
- After the last folding, let the dough rise an additional 30 minutes.
- Split the dough into two loaves.
- Form them gently on parchment by folding each in thirds again. They will be rectangular loaves that are slightly flat. They should be about 6 inches by 8 inches.
- Preheat the oven to 500ºF and place a baking stone or a sheet tray in the oven to preheat as well.
- Let the loaves rise an additional hour, they won't quite double but will be close.
- Fill a 9x13 pan with water and place it on the top rack of the oven. This creates steam and will help make the outside of the loaf nice and crusty.
- Place the loaves on the baking sheet or baking stone (leaving the parchment under them).
- Reduce the oven temperature to 450ºF.
- Bake them for 10 minutes, then rotate the loaves and bake for an additional 10 minutes.
- The loaves will be golden brown when finished and the internal temperature will register at 205ºF.


Alli
Great bread recipe!