

This 60-minute homemade Herb Bread is not only a showstopper, it's delicious and one of the easiest yeast breads you'll make! Perfect for any skill level!
WANT TO SAVE THIS RECIPE?
Enter your email below and we'll send it straight to your inbox. Plus you’ll get great new recipes from us every week!
Why You'll Love This Italian Herbed Bread Recipe
- Easy to make: This herb bread comes together quickly. It's faster than most yeast bread {60 minutes total!!} and it is a total confidence booster because it turns out every time.
- Tried and true: After making it countless times, this recipe has proven to turn out perfectly every single time.
- Beautiful presentation: The braided loaf looks impressive and makes any meal feel a little extra special.
- Family favorite: It’s a nostalgic recipe inspired by my childhood bread-baking memories, adding a warm, homemade touch. Bread is my favorite thing to make. For real, it's my one true favorite. I love cooking and making other baked goods, but I have loved baking bread since I was a child.
- Crowd pleaser: Everyone who tries it asks for the recipe—it’s flavorful, soft, and always a hit at gatherings.

PS: If you're a total bread making junkie like me, you need this book: The Bread Baker’s Apprentice: Mastering the Art of Extraordinary Bread. {affiliate link}
It is full of delightful recipes for all kinds of artisan-style breads, plus it explains so many awesome things about making bread, pre-ferments, flour types...I could go on. I want to marry this book. Just kidding. But I read it like a bed time story.
Ingredients: What is Herb Bread made of?
- All-purpose flour
- Sugar
- Yeast
- Salt
- Dried Herbs - Rosemary, Oregano, & Basil — Feel free to use an Italian blend!
- Garlic powder
- Milk
- Olive oil
- Egg
- Water
- Butter
Equipment for Making Garlic Herb Bread
- Stand mixer
- Glass mixing bowls
- Measuring cups and spoons
- Spatula
- Liquid measuring cups

WANT TO SAVE THIS RECIPE?
Enter your email below and we will send it straight to your inbox. Plus you will get great new recipes from us every week!

Garlic Herb Bread
Ingredients
- 4-4 ½ cups flour (see note)
- 3 tablespoons sugar
- 2 tablespoons yeast
- 2 teaspoons salt
- 1 teaspoon dried rosemary ( 2 teaspoons chopped fresh)
- 1 teaspoon dried oregano (2 teaspoons chopped fresh)
- 2 teaspoons dried basil (2 teaspoons chopped fresh)
- 1 teaspoon garlic powder
- ¾ cup milk
- ¼ cup olive oil
- 1 egg
- ½ cup water
- 2 tablespoons butter (melted and cooled)
Instructions
- Preheat oven to 375ºF.
- In a large bowl or the bowl for a standing mixer, whisk 4 cups of flour and the rest of the dry ingredients together.
- Whisk milk, olive oil, and egg together. Pour into dry mix and start to combine.
- While the dry ingredients and milk mixture combine, slowly pour in the water.
- The dough should be slightly tacky. It will clean the sides of the bowl but stick to the bottom of the bowl. Add more flour, if needed.
- Once dough is the correct consistency, knead for about 5 minutes until the texture is smooth and elastic. You should be able to stretch the dough a bit without it breaking.
- Cover the dough and let rest in the mixing bowl or on the counter for 15 minutes.
- After the dough has rested, form it however you'd like.
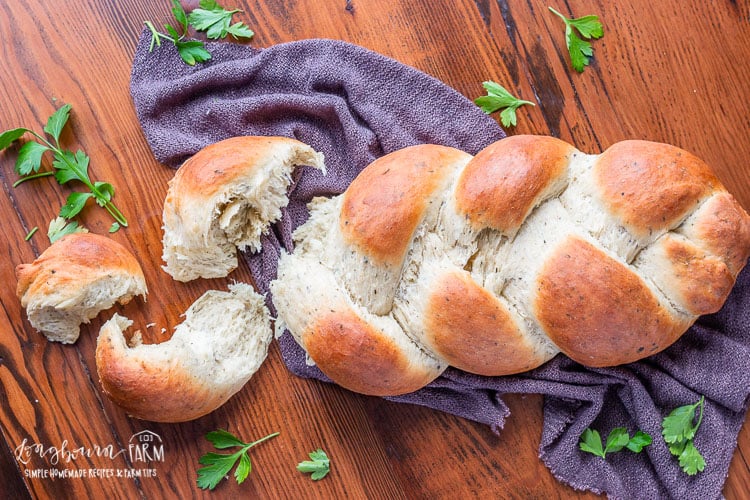
- To make a braid, separate it into 3 pieces and lay them flat on a lined or greased cookie sheet. Starting at the top, bring the outside strand over the middle strand, so it becomes the new middle strand. Repeat with the opposite side. Repeat this pattern until the whole loaf is braided.
- Pinch and tuck under both of the ends.
- Cover and let rest 15 more minutes.
- Bake on a lined or greased cookie sheet for 20-25 minutes, until the top is golden brown. The internal temperature should register between 205-210°F if you prefer to use a thermometer.
- Brush top of baked bread with melted butter and let cool.
Notes
- Freeze shaped dough before the final rise, then thaw 45 minutes before baking for fresh bread anytime.
- To Bake: Place frozen dough in a cold oven, preheat to 350°F, and add 5–7 minutes to the baking time.
Nutrition
How to Make Herb Bread
Step 1: Preheat oven to 375ºF. In a large bowl or the bowl for a standing mixer, whisk 4 cups of flour and the rest of the dry ingredients together. Whisk milk, olive oil, and egg together. Pour into dry mix and start to combine. While the dry ingredients and milk mixture combine, slowly pour in the water.
Note: The dough should be slightly tacky. It will clean the sides of the bowl but stick to the bottom of the bowl. Add more flour, if needed.
Step 2: Once dough is the correct consistency, knead for about 5 minutes until the texture is smooth and elastic. You should be able to stretch the dough a bit without it breaking. Cover the dough and let rest in the mixing bowl or on the counter for 15 minutes.
Step 3: After the dough has rested, form it however you'd like. To make a braid, separate it into 3 pieces and lay them flat on a lined or greased cookie sheet. Starting at the top, bring the outside strand over the middle strand, so it becomes the new middle strand. Repeat with the opposite side.
Repeat this pattern until the whole loaf is braided. Pinch and tuck under both of the ends. Cover and let rest 15 more minutes.
Step 4: Bake on a lined or greased cookie sheet for 20-25 minutes, until the top is golden brown. The internal temperature should register between 205-210 degrees F if you prefer to use a thermometer. Brush top of baked bread with melted butter and let cool.
How to Know When the Yeast is Ready
If you want to, you can bloom the yeast in warm water before adding it to the dough to make sure it’s active. For this recipe, though, you can simply mix it straight into the flour—no need to proof first. If the dough rises nicely and feels light and puffy after resting, that’s your sign the yeast is doing its job.
Herb Bread Recipe Tips & Substitutions
- Slightly sticky dough: This dough is meant to be slightly sticky. It should stick just to the bottom of the bowl without being overly wet.
- Herb flexibility: Use any combination of herbs you prefer. If using dried herbs, use about one-third the amount of fresh.
- Whisk the egg: Beat the egg before adding it to the dough for even mixing.
- Room-temperature ingredients: Cold liquids can slow yeast activity and affect how well the bread rises.
- Check dough texture: If the dough feels too dry, add a tablespoon of water at a time until it comes together smoothly.
Storage Tips
Herb bread can be stored in an airtight container at room temperature.
Another reason I love this homemade herb bread recipe is that the dough freezes perfectly. Often, I'll make a double batch and form rolls instead of the braid. I place about 6 rolls {just do however many your family will eat in one sitting}, leaving out the last 20-minute rise step, in greased disposable pie plates.
I label a gallon zip top bag with the baking instructions {in the recipe!} and then slide the pie plate in the bag and seal it up! Once they are frozen a bit, you can stack them in your freezer and have a nice stockpile of instant warm homemade herb bread waiting for you!

Serving Ideas for Herbed Bread
This herbed bread pairs beautifully with a wide range of dishes and makes any meal feel more complete. Serve warm slices alongside comforting pasta dishes like White Bean and Kale Pasta or Sausage Alfredo Pasta to soak up all that creamy or savory sauce. The subtle herbal flavor complements both rich and light pasta meals, adding just the right touch of homemade goodness.
It’s also delicious with vegetable-forward recipes like Pasta Primavera, Lemon Ricotta Pasta, or Zucchini and Sausage Spaghetti. The soft, aromatic bread balances fresh, bright flavors and makes a perfect side for any Italian-inspired dinner. For extra flavor, brush warm slices with melted butter or olive oil and a sprinkle of sea salt before serving.
Herbed Bread Recipe FAQs
You can substitute in fresh herbs, just double the amounts written in the recipes.
No, you don't need a stand mixer to make this bread. You can mix it by hand and knead it by hand as well. Double the kneading time if you are kneading it by hand.
Herbs are the perfect way to add flavor and depth to your homemade bread. And the good news is, there are so many herbs that taste amazing in bread!
Some popular herbs to use in bread include:
-Rosemary
-Thyme
-Oregano
-Basil
-Sage
-Fennel
-Cumin seeds
-Chives
I’ve used a mix of rosemary, oregano, and basil in this herb bread recipe to create an Italian-inspired flavor. However, feel free to experiment with different herbs and create a unique blend!
You should always add herbs to your bread dough before it rises. This will allow the herbs to infuse their flavor into the dough and create a more flavorful bread. Adding herbs after the rising process may result in uneven distribution and would flatten the rise.
More Favorites From Longbourn Farm


Did you make this recipe? Leave a ⭐️ review and share it on Instagram, Facebook, or Pinterest!


Lisa
I really enjoy the simplicity of this breqd. It is a nice respite from all the hours and attention involved in sourdough and tastes great,
Kathleen
What type of flour do you use in this recipe? It just says “flour”. All Purpose? Bread?
Alli
All purpose flour.
Kat W
Made this for Thanksgiving 2021 and have found my new "go to" bread recipe!
Super easy, and appreciate the notes, as I consider myself an amateur baker and have been put off of baking bread by other recipes not having those finite details that really describe the dough. My bread was perfectly cooked and my house smelled like thanksgiving in every way, i used fresh sage, rosemary and thyme. Perfect addition to our meal!
Now I just need to work on 3 EQUAL braids! 🤭Lol
Alli
I'm so happy you loved it Kat! Thank you! And I still don't get the 3 parts equal 😂
Zanne
My family went NUTS over this! I would like to double the recipe and cook one loaf today and one the next. Have you ever refrigerated the dough overnight? I think it'd be best freshly baked.
Alli
So happy everyone loved it! I have refrigerated the dough overnight for the first resting step, but it will change the flavor slightly. I don't love the flavor of this particular dough after it goes overnight but give it a whirl and see what you think! You may like it.
Emma Driscoll and Serenity Driscoll
This recipe is wonderful i tried with tuscan herb oil and it rose perfectly and smelled great!
Alli
Oh, that sounds amazing!!! So glad you liked the recipe.
Brynn
Mine completely exploded in the oven and I'm into 35mins of baking and it's still not cooked!
Alli
Hi Brynn, I'd be happy to help you troubleshoot what went wrong. I'm not sure what completely exploded means, but if it's been in for 35 minutes and isn't cooked I'd definitely check your oven temperature. I know this recipe is good, I've personally made it many times and it's been made by other readers hundreds of times.
Alli
One of my most requested recipes!
Kim Blanchard
Actually your comment got me curious so I googled it and found an article on King Arthur flour where they tested whether active dry yeast had to be softened and/or proofed before using. They found no difference between adding it straight to the flour or dissolving it in water first. I think I'll probably keep softening it in my usual bread recipes but when I see recipes like yours I'll try it the other way. I love this bread science stuff!
Kim Blanchard
Actually your comment got me wondering and googling and I found an article on King Arthur flour that says you really don't have to proof or dissolve active dry yeast these days. They tested just missing it right in the dry ingredients like you and it worked fabulously. I think I'll still soften my yeast just out of habit for my usual recipes but when I see recipes like yours that mix it right in I'll do that too. Fun to learn something new!
Kim
Huh. I thought you always had to proof active dry yeast. That's the only way I've ever used it. And I keep it in the fridge/freezer too. I guess you learn something new every day! I'll try it your way next time. 🙂 I do love my wheat grinder. I just grind a small batch every week or so (depends on how actively I'm baking) and it only takes about 5 minutes. Pretty great.
Alli
Ok so I double checked my yeast. I always put it in a rubbermaid container after I buy it because it just comes in a bag so I thought there was a good chance I forgot what I bought. And I did. It's totally instant yeast, you were right!!! And you are right about proofing it as well, I had that mixed up too. Ah well. I should fact check my cooking knowledge before commenting 🙂 Thanks for the correction!
Kim
I made this and it was delicious! I didn't have instant yeast (which I assume is what you used in your recipe) so instead I proofed my active dry yeast in the 1/2 cup warm water with 1 TB of the sugar. I also subbed 1 cup of the all purpose with fresh ground white whole wheat flour. I followed the rest of the directions as you had them, using a spoon and arm power because that's how I do all my bread making. I had to let it rest initially for longer than 15 minutes because babies don't care about bread making, and while it got a little bigger than I was expecting and not quite as neat looking as your pictures, it tasted great and was a hit at our dinner last night! I'll be making this one again, that's for sure. Thanks, Alli!
Alli
Hi Kim! I'm so glad you loved the bread! I actually use active dry yeast but never worry about proofing it since I keep it in my refrigerator and it's pretty unlikely it would go bad because I go through it so quickly. I'm so impressed you grind your own flour! Maybe one day I'll be that ambitious 🙂