

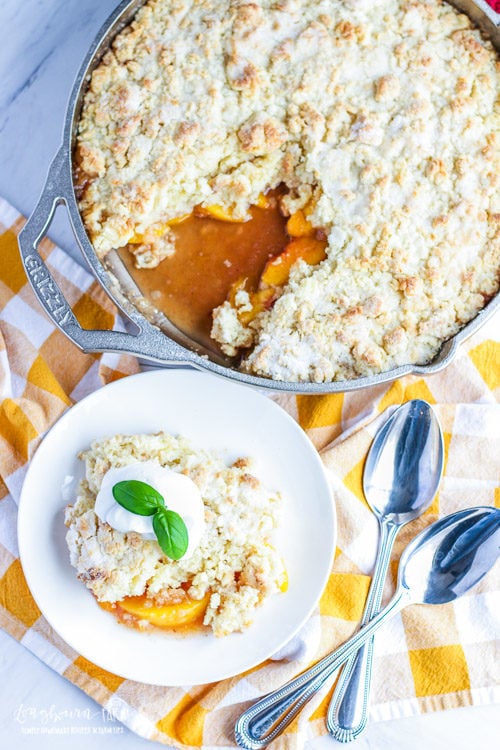
This easy peach cobbler recipes is a family favorite! Flavorful and lightly spiced peaches topped with the softest biscuit crust ever. So simple to bake up in a GRIZZLY Cast Iron skillet, you'll be asked for the recipe again and again!
WANT TO SAVE THIS RECIPE?
Enter your email below and we'll send it straight to your inbox. Plus you’ll get great new recipes from us every week!
This post was sponsored by GRIZZLY Cast Iron Cookware, all opinions expressed are my own. Read more about sponsored content in my disclosure.
I am so very excited to be sharing two amazing things with you guys in this post! This beautiful GRIZZLY Cast Iron Skillet has been rocking my world, I love it. I am also in love with this easy peach cobbler recipe I developed, it is the perfect balance of peaches and crust {my favorite part}. Let's dive in!
First, let me tell you about this GRIZZLY cast iron skillet. I ran it through the ringer, you guys. I cooked everything in this skillet to make sure I could give you an accurate opinion on it. The verdict? I LOVE IT SO MUCH. And ya'll know that I'd say if I had a problem with it. It has all the wonderful benefits of a very high quality cast iron, heavy, even heat distribution, etc. BUT --
You don't have to season it. SAY WHAT????
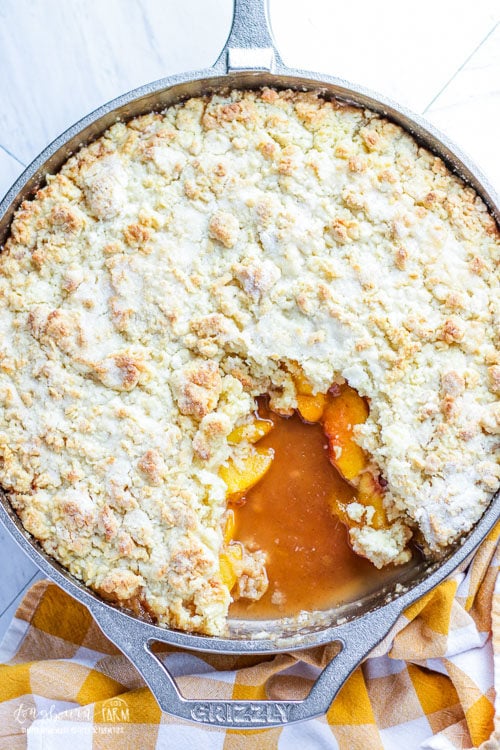
Yeah, for real. This beautiful GRIZZLY cast iron skillet doesn't rust and doesn't require any seasoning before or after use, and the surface cooks even better than my traditional cast iron skillets. I was excited to use it for this skillet peach cobbler recipe because I love baking in cast iron, they get very hot and retain that heat which allows the filling gets nice and thick while the top stays tender and soft.
Peach Cobbler in a Cast Iron Skillet: Fresh vs. Frozen Peaches
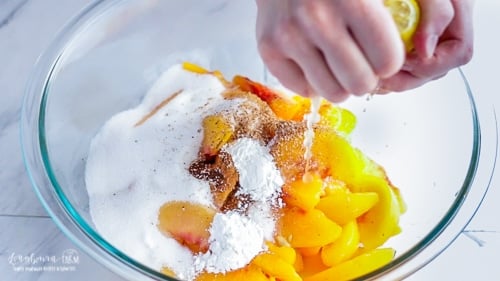
The filling for this cast iron peach cobbler is, well, easy. You can use fresh or frozen peaches in this cobbler, which is something I really wanted in this recipe because it can be hard to find fresh peaches here in my tiny mountain valley until they are in season. If you let frozen peaches thaw, they will cook up just like fresh peaches and have a similar moisture content.
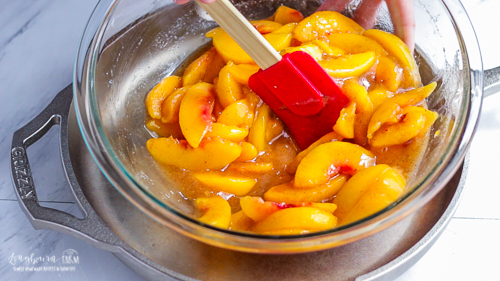
You can see from this picture that there is quite a bit of liquid in the filling. You really do need to mix it up first and let it sit, that way the sugar will draw out the moisture from the peaches and it will have time to thicken up in the oven.
After your filling is prepared, you can get the crust ready. This is my favorite part, it's actually based on the shortcake I used for my strawberry shortcake recipe. It is amazing! Kind of like a biscuit because you cut in the butter but more crumbly and so tender it just melts in your mouth.
Cutting in butter can seem tricky, but it is really easy.
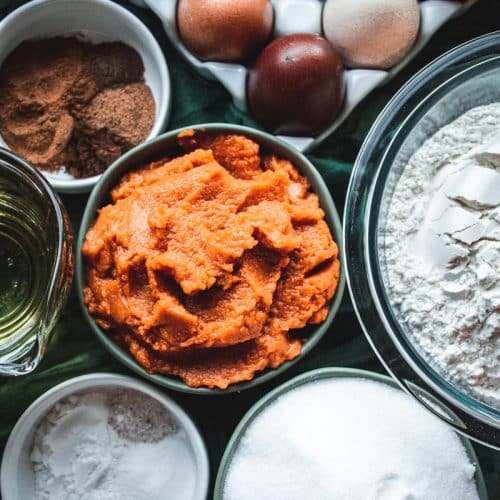
Ingredients for Peach Cobbler in Cast Iron Skillet
For the Peach Filling
- Peaches
- Cinnamon
- Cloves
- Nutmeg
- Lemon juice
- Corn starch
- Sugar
For the Cobbler Crust
- All-purpose flour
- Sugar
- Salt
- Baking powder
- Butter
- Heavy cream
- Half and half
- Vanilla extract
For Assembly
- Heavy cream
- Sugar
For the exact amounts needed, please see the recipe card below.
How to make Peach Cobbler in a Cast Iron Skillet
- Start by preheating your oven to 400°F.
- Combine your peaches, sugar, spices, lemon juice, and cornstarch in a large bowl until the ingredients are well mixed.
- Leave the peaches to sit in the sugar as you make the crust. They'll release their juices, making for a delicious syrup once cooked.
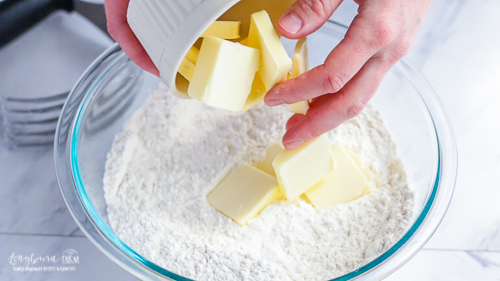
- Mix the flour, sugar, salt, and baking powder in a separate bowl.
- Cut in the cold butter until it forms pea-sized pieces throughout the mixture.
- Pour in the heavy cream, half and half, and vanilla extract.
- Mix with a fork until it just comes together. Don't overmix; it'll be crumbly, but hold together when pressed.
- Pour your peach mixture into a cast iron skillet and evenly distribute the peaches.
- Sprinkle the cobbler crust over the top of the peaches, again ensuring it’s distributed evenly.
- Drizzle 2 tablespoons of cream and 2 tablespoons of sugar over the top of the crust mixture.
- Bake for 40 minutes or until the edges are golden brown and the peach filling is bubbling.
- Allow to cool before serving.
Cast Iron Peach Cobbler Recipe: Dough Tips
- Make sure all your ingredients are cold, I throw the bowl into the fridge while I prep the peaches so that everything stays nice and chilled.
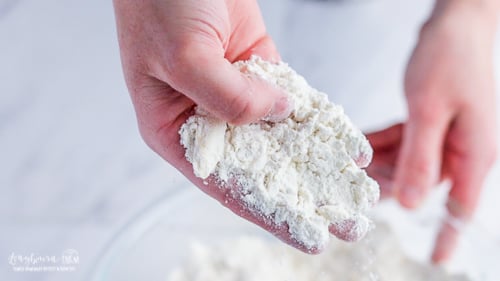
- Slice the butter up into ¼ inch pieces, that way it cuts in easily and doesn't have too much time to warm up and start to melt. Cold butter makes flakes!
- The texture should be about the size of peas, but this is an average. See how there are larger and smaller pieces in my hand in the picture above?
- The first part of this process is actually very similar to making pie dough! If you can do that, you can do this.
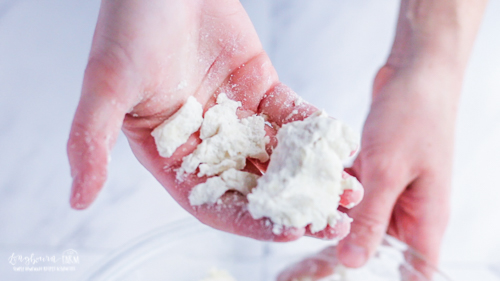
After you cut in the butter, you'll mix in the cream and half and half. This is where I need to you trust me. Ha!! But seriously. It will look like it's not wet enough to be a dough {reference the video}. It will smush together if you make a fist like in the picture above, but still be crumbly.
It's done. It's ready. It will be delicious. TRUST ME!

Pour that delicious, spicy peach mixture into your beautiful GRIZZLY Cast Iron skillet and spread it out evenly. I try to make sure the peaches are evenly distributed around the pan.
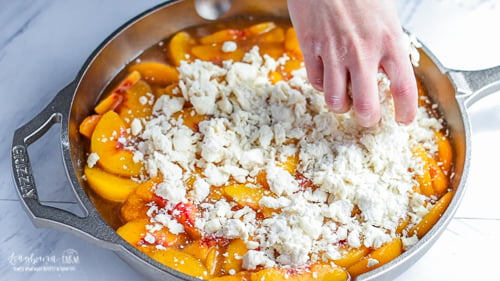
Then, top it with the crumbly dough! Just sprinkle it all on there, trying to get it evenly distributed across the top.
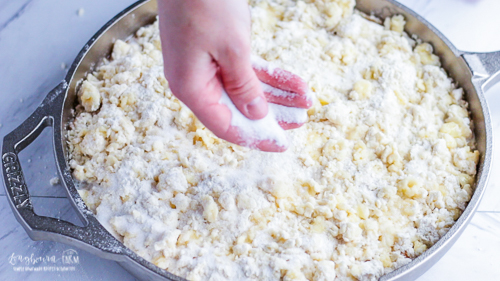
Now, this last part is optional {but why wouldn't you???}, you can drizzle more cream over the top and sprinkle some sugar over the cream. This creates a lovely crackle on the top of the crust that adds a nice texture to the whole dessert. Good luck not salivating while you wait for this amazing cast iron skillet peach cobbler to come out of the oven!
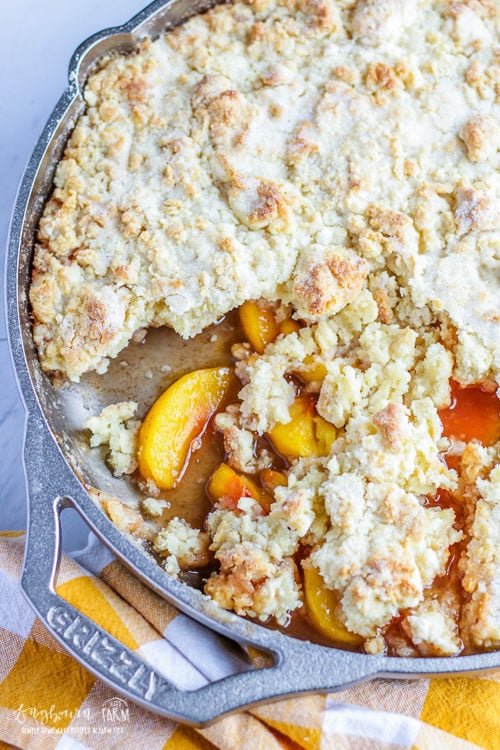
I mean, does it get any better than that? Look at all that texture and flavor! After the cast iron peach cobbler is done baking, you technically should let it cool, that will allow the filling to thicken up even more. But who has time for that?? I usually just dig right in.
Let me know if you loved this recipe! You can check out all of GRIZZLY's amazing Cast Iron products and the story behind this American company at this link.

How to serve Peach Cobbler in Cast Iron Skillet
In my opinion, peach cobbler is best served warm with a scoop of vanilla ice cream! But if you'd like to get creative, try topping it with some homemade whipped cream or a sprinkle of brown sugar and cinnamon. Warm custard or caramel sauce would work great, too!
For extra flavor and texture, you can also top your cobbler with fresh berries. Add sliced strawberries, blueberries, or raspberries for a sweet and tart combination.
Cast Iron Peach Cobbler Recipe FAQs
A soggy crust usually happens when the filling is too wet. To avoid this, ensure your peaches sit with the sugar long enough to release their juices. The cornstarch will then thicken the juice up in the oven.
Another cause for a soggy crust is not evenly distributing the crust over the filling. If some areas have more crust, it'll take longer to bake – meaning it won't have time to crisp up! Finally, always work with cold butter when making your cobble crust. Otherwise, it'll melt too quickly, turning your delicious crust into a soggy mess.
The best way to keep leftover cobbler crispy is to store the crust separately from the filling. I know this isn't the most convenient way, but it'll keep the crust from absorbing too much moisture and becoming soggy.
You can separate the two and store them in different containers, or you can actually cook the cobbler in two separate pans. Just bake the crust in one pan and add it to the filling when you're ready to serve. It might not be the most traditional way, but it'll ensure your cobbler is always nice and crispy!
The cobbler batter usually goes on top of the fruit filling. The benefit of this is that it forms a delicious crust over the top, which helps to trap in all the juicy flavors of the filling. It also looks beautiful when it's served - a golden, crispy crust over a bubbling, fruity filling - yum!
WANT TO SAVE THIS RECIPE?
Enter your email below and we will send it straight to your inbox. Plus you will get great new recipes from us every week!

Cast Iron Skillet Peach Cobbler
Equipment
Ingredients
For the Peach Filling
- 2 pounds peaches (peeled and sliced, see note)
- ½ teaspoon cinnamon
- ¼ teaspoon cloves
- ¼ teaspoon nutmeg
- 1 tablespoon lemon juice (about half of a lemon)
- 2 teaspoons corn starch
- 1 cup sugar
For the Crust
- 3 cups flour (all-purpose)
- ¼ cup sugar
- ¾ teaspoon salt
- 3 teaspoons baking powder
- 12 tablespoons butter (cold)
- ¼ cup heavy cream
- ½ cup half and half
- 1 teaspoon vanilla extract
For Assembly
- 2 tablespoons heavy cream
- 2 tablespoons sugar
Instructions
- Preheat oven to 400 degrees F.
- In a large bowl, combine peaches, sugar, spices, lemon juice, and cornstarch. Stir well until completely combined.
- Set aside while you prepare the crust, it is important to give the peaches time to sit with the sugar.
- Combine the dry ingredients for the crust.
- Cut in the cold butter until the pieces average the size of peas.
- Add the cream, half and half, and vanilla extract.
- Mix until it just comes together, a fork works well for this. Do not overmix, it will be crumbly but hold together when pressed.
- Pour the peach mixture into a cast iron skillet (see note) being sure to evenly distribute the peaches.
- Top with the crust mixture, making sure it is evenly distributed across the top of the peaches.
- Drizzle 2 tablespoons of cream over the top of the crust mixture.
- Sprinkle 2 tablespoons of sugar over the top of the crust mixture.
- Bake for 40 minutes, or until the top is golden brown and the peaches are bubbly around the edges of the pan.
- Allow to cool before serving (see note).
Alli
Love the crust on this recipe!